Showing posts with label SharePoint Online. Show all posts

Thursday, February 12, 2015

You have reached the maximum resource usage limit

Our organization's O365 tenancy has a lot of Global Administrators.
Global admins have the ability to set among other things, SharePoint Site Collection Storage Quotas and the often misunderstood Server Resource Quota.

There has been misunderstood thought that by increasing this setting to some really big number, their site collection will have blazingly fast performance and every other site collection will chug along at their slow dial-up rate.

This is not at all true, and in fact you can really mess things up by setting these numbers too high.

Consider this:
A Site Collection is created and then assigned a huge number of resources. Then it is deleted.
This happens a few times and before long, your SharePoint Admin Center displays this ugly error and you are unable to manage resources on any of the collections.

You have reached the maximum resource usage limit. - Well dang!


And... you can't increase or decrease any site collection resource! Sort of a Catch 22, right? So you decide to start deleting site collections thinking this might help!


You would expect those resources to free up since you deleted them, right? But they just don’t and that mean ol' red bar stays red.

The deleted collection is in the Site Collection Recycle bin. Those resources are not reallocated just because you deleted it. They are still awaiting to be purged and those resources need to stay allocated until then.

 So what do you do?

PowerShell to the rescue!
Here is what we had to do to return our site back to normal.

First, query the site owners and ask if they have any sandboxed or custom code on their sites and need those extra resources to debug or step thought their code.
 If they do, understand their burden and pity them. Leave them to their debugging, and focus on the deleted sites and the sites where there is no custom code.

Then fire up a SharePoint Online or Azure PowerShell command prompt and connect to your admin portal,
connect spo-service http://contoso-admin.sharepoint.com 
…notice the -admin, it’s the URL of the admin portal.

Authenticate with a Global Admin account.

Open the admin console and look in the Site Collection recycle bin:


Grab the URL of a deleted site.
Then delete it, with extreme prejudice.
Remove-SPODeletedSite -Identity [URL of site in recycle bin]

Do this for each site in the recycle bin.

When that’s done, the ugly error "You have reached the maximum blah blah" and red bar ought to go away!

Nbow you need to attempt to set the resource quota for one of those collections that are set to some large number.
You might try reassigning it in the admin portal, but what fun is that? You still have that console open, so…
Set-SPOSite -Identity https://BigSite/sites/ituneslibrary  -ResourceQuota 300

Now all should be right in the world.

The resource usage quota is a site collection metric calculated by SharePoint Online. The main purpose of resource quotas is to limit the risk that sand-boxed custom code can have on available resources on a site collection, bad code causing excessive CPU use for example.

The actual resource quota used to be determined by the number of user seats in your company's subscription (#seats×200) +300 (may have changed now). 

So for a 10 seat license, the resource quota would be 2300 split across all site collections you own

HopeThisHelps,

John

Monday, September 29, 2014

Auto-Tune and issues downloading large files form SharePoint Online

Some O365 clients may experience errors or disconnects or slowness with uploading/downloading large (>10MB) files from SharePoint Online. There is a workaround on client side. Need to disable Auto-Tune.
This will stay at some small % for a long time :

 Then eventually:


To fix this, from a command prompt ->
netsh int tcp set global autotuninglevel=disabled  

Shout out: http://sharepoint-community.net/profiles/blogs/o365-sharepoint-online-not-able-to-download-upload-large-file

Tuesday, April 15, 2014

Using OneDrive for Business Step by Step

A Step by Step guide to setting up your 1D4B sync on Win7 and the end user experience with setting this up.

Click the OneDrive link in your SharePoint or Office365 navigation bar.

Now...Go ahead and Press SYNC... and prepare for a wild ride!


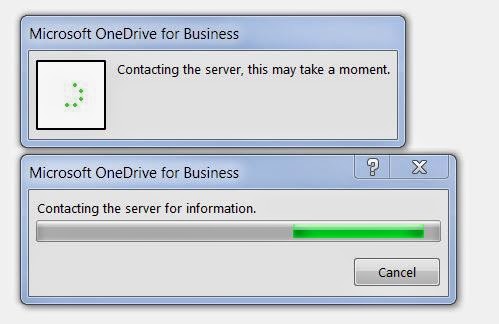
You will see a few 'Working on it' type popup messages like this one...


and this one...


Now, this last one. 

OK. User interaction time!
You will need to click Sync Now button above to "Release the hounds"
Depending on how much content you have in your Documents library, it can take a few minutes to SYNC it all.  If your online library is empty it should only take a minute or 2.


Finally... you see a shiny new Explorer Favorites icon for One Drive for Business with your files.


You are ready to work offline. When you update content in these folders, they will auto sync to the cloud if you are connected to the interweb thingy. Thanks to Ray Ozzie and GROOVE.EXE !

Thursday, April 10, 2014

How to Unsync a OneDrive for Business object

Why would you want to unsync? In my case I was syncing some RFP documents from a SharePoint library. We had finished the RFP and I want to now stop syncing and remove the files from my computer.

Some background: My computer has both a OneDrive for Business (1D4B) icon and a SharePoint icon. This means I have a MySite OneDrive for Business library synced into my 1D4B icon and I have SharePoint site libraries synced to my SharePoint icon.


 To stop syncing a library or something from either of these icons:


Right Click the OneDrive for Business icon in the Windows notification area, and then click Stop syncing a folder…

Select the folder you want to stop syncing, and then click Stop syncing. When you stop syncing a folder, this simply disconnects the folder from its library. All files are retained in the previously synced folder up on the server. You can sync the library to your computer again at any time in the future.


So now that you've done that, the files still remain on your computer but the individual file icons will change from the 'Synced' icons to the standard file icons.

You can now delete these (without any sync error) or keep them, up to you.

If you delete the SharePoint icon it will show up the next time you sync something from SharePoint, so dont worry if you 'accidentally' delete it.


1D4B vs Win2012R2 Share Folders

In 2013, MSFT Storage Team announced a new feature in Windows Server 2012 R2.
Work Folders enables user to access their work related files on the devices with configured Work Folders no matter whether the devices are joined to a domain or not and whether the devices are connected directly to the corp net or over the internet.

That is a nice upgrade from the Windows XP breifcase right? So, later comes One Drive for Business as a Cloud Based storage solution.

Last week a client of mine asked "Which solution do I implement?"

I gave him the consulting drinking game answer "It Depends".

While at SharePoint Saturday Philly I attended the single most underrated session, Ask the PFE's. where a panel of MSFT'ies answers all your burning questions. Kudos to that team, led by SharePoint Samurai Mike Gannotti @Gannotti

After a round of discussion, this is what the team said:  "It Depends"

Crack open a cold one and let's you and I discuss further.

The following table discusses how various Microsoft sync technologies are positioned and when to use each.


Work Folders
Offline Files
SkyDrive Pro
SkyDrive
Technology summary
Syncs files that are stored on a file server with PCs and devices
Syncs files that are stored on a file server with PCs that have access to the corporate network (can be replaced by Work Files)
Syncs files that are stored in Office 365 or in SharePoint with PCs and devices inside or outside a corporate network, and provides document collaboration functionality
Syncs personal files that are stored in SkyDrive with PCs, Mac computers, and devices
Intended to provide user access to work files
Yes
Yes
Yes
No
Cloud service
None
None
Office 365
Microsoft SkyDrive
Internal network servers
File servers running Windows Server 2012 R2
File servers
SharePoint server (optional)
None
Supported clients
PCs and devices* inside or outside a corporate network
PCs in a corporate network or connected through DirectAccess, VPNs, or other remote access technologies
PCs, iOS, Windows Phone
PCs, Mac computers, Windows Phone, iOS, Android
*Work Folders apps not yet announced.


Conclusion:
Until the WorkFolders App is released (unknown) the answer is clear that if you need both device independence with multiple device access, OneDrive for Business is the answer.
If you need internal access only, WorkFolders can be the best solution.
But other than that, I see no reason NOT to go with more functionality you get with OneDrive for Business.


Wednesday, January 8, 2014

Shared With and SHARE issues


I recently was requested to hide all instances of the Shared With pop up window from users. The client did not want anyone to see the names of admins and other individuals that had direct permissions.

There are 2 ways to hide, one using straight CSS and another manipulating via jQuery.


Using CSS
We found this here: .li > text."Shared With"

/*Hiding the SharedWith stuff */
.js-callout-sharedWithInfo{
display:none !important;
}

Using jQuery

$('.js-callout-sharedWithInfo').css('display','none');

        <script type="text/javascript">
        $(document).ready(function(){
                $('.js-callout-sharedWithInfo').css('display','none');
                });

        </script>

Along the same lines, we wanted to have the Send an Email link that is checked by default to be unchecked.

In order to void your warranty and change the default behavior of the SharePoint SHARE feature to UNCHECK the Send Email box...
Note that a PU or a CU may overwrite this file at anytime...which is what I sort of mean by "void your warranty".

Go to the file...
C:\Program Files\Common Files\Microsoft Shared\web server extensions\14\TEMPLATE\LAYOUTS\actinv.aspx

And change changed the Checked="true" to Checked="false" 

<div class="ms-core-form-subsection">
<asp:CheckBox
runat="server"
id="chkSendEmailv15"
Checked="true"
class = "ms-aclinv-checkbox"
OnClick="UpdateSendEmailMessage()"/>
<label for=<%SPHttpUtility.WriteAddQuote(SPHttpUtility.NoEncode(chkSendEmailv15.ClientID),this.Page);%>>
<SharePoint:EncodedLiteral runat="server" text="<%$Resources:wss,aclinv_SendEmailCheckboxv15%>" EncodeMethod='HtmlEncode'/>
</label>

Friday, November 15, 2013

How to create departmental sub sites in O365

You just spun up a new O365 Tenancy and now you need to populate it for the client. ( P1, E1, doesn't matter here. This pertains to all types.)

You are also tasked with creating secured sub sites for the Intranet.

Presume for a moment that you've already had the discussion of what they want for a taxonomy with the SharePoint catalyst at the organization, by catalyst, I mean the Steering Committee, champion or leader.
For instance, they could direct you with " I want an, Admin Site, two Product sites and a Finance site and an HR site"


Ideally, you would want that person to email you an excel that looks like this to allow you to successfully create the new groups and apply the permissions. This could take some time to get, but provide them with this one, empty for them to fill out, and you might get a quick response.

SharePoint Group
Administration Site
Product Line A
Product Line B
Finance
Human Resources
Owners
Steve Doran
Helen Amaral
Debra Murphy
James Financier
Holly Francis
Members
Mindy Loo
Jocelyn McDoon
Katherine Baxter
Jordan McCluskey
James Duby

Talli Evangelista
Janet Caponata
Brenda Fleming
Heather Klugh
Shah Fariz


Doral Comeau
Gabriel Lopez


Ann Comton
Janet Moore


Visitors
All Employees
All Employees
All Employees
nobody
nobody


nobody
nobody


With that in hand, follow the below steps to create the sub sites:

Log into the site using the admin credentials
Using the Gear icon in the utility area, select Site Contents


Scroll to the bottom of this page and you will see where they hid the link to create a new Sub Site ;-)


Here you can name your subsite and set up security and navigation options


You now are asked to populate the new Security Groups.


You can individually add users here, but if you have a lot of users, this can take a long time.
Fortunately you have options.
1.      Windows Azure Powershell - See Blog Post on  'Howto configure O365 user passwords to never expire'
2.      Excel reformatting trick to get names to be able to paste into the People Picker box.
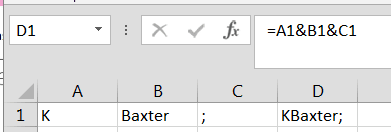
a.      You need to get your usernames in the format of email address or FirstInitial+LastName>
b.      To get that from "John Mongell" pop it into excel, Text to Columns, Space Delimited.
c.      Now take those two rows and split the first on delimited by first character.
d.      Now join that new initial with the last name column and append ";" 
example


After you click OK, your site will be provisioned.
Go back to the TOP LEVEL and do it again for the next site, but be sure to know where you are provisioning from!

 You don’t want to provision a sub site underneath the site you just created if it was supposed to be closer to the top.

Tuesday, October 1, 2013

How to configure passwords to never expire in O365

Install the Windows Azure AD Module

You must install the appropriate version of the Windows Azure AD Module for Windows PowerShell for your operating system from the Microsoft Download Center:
Windows Azure Active Directory Module for Windows PowerShell (32-bit version)
Windows Azure Active Directory Module for Windows PowerShell (64-bit version)

Start the Windows Azure Active Directory Module for Windows PowerShell


Connect to Windows Azure Active Directory

Type connect-msolservice …and log in with your admin account
Review: the TechNet Article for a list of available commands
http://technet.microsoft.com/library/jj151815.aspx

Run the following command to GET a specific user's Password Expiration Policy:
Get-MSOLUser -UserPrincipalName user@company.com | Select PasswordNeverExpires

Run the following command to GET ALL User's Password Expiration Policy:

Get-MSOLUser | Select UserPrincipalName, PasswordNeverExpires
Run the following command to SET a User's Password Expiration Policy:

Set-MsolUser -UserPrincipalName [user@company.com -PasswordNeverExpires $true


TIP: if you love Get-Help then you will need to add it: 

To create a folder for help, list the cmdlets, and then open the file in notepad, you can run the following commands at the Windows PowerShell command prompt:
new-item c:\MSOLHelp -type directory
get-command | Where-Object {$_.name -like "*msol*"} | format-list | Out-File c:\MSOLHelp\msolcmdlets.txt
notepad c:\MSOLHelp\msolcmdlets.txt

Friday, June 7, 2013

PowerShell Online

Set up the SharePoint Online Management Shell environment for SharePoint Online global administrators.
Love It!

Perform the following:


Try it out! For example, run Get-SPOSite to get a list of all sites.

Tuesday, April 2, 2013

Open in Windows Explorer not available after IE10 update

Problem:
The “Open with Windows Explorer” feature for a library no longer works on your SharePoint site

Cause:
We usually put the company SharePoint site in the Intranet Zone.
For some bizarre reason, MSFT decided that in IE10 they are going to force Compatibility View on all sites in this zone.


Solution:
In IE, go to Tools> Compatibility View settings:
1. Remove any sites in there that you don’t want in there
2. Uncheck Display intranet sites in Compatibility View


3. I prefer to uncheck that last interesting one, as I would rather MSFT did not decide what list of sites should be placed here for me.

Thursday, January 3, 2013

Mapping a network drive in Office 365

Authentication requirements and steps required to map a network drive in Office 365 SharePoint.


1. Login to the Portal http://portal.microsoftonline.com

Sign in to the SharePoint Online site by using your Office 365 credentials. Make sure that you click to select the Keep me signed in check box. This is important because you need to be (and stay) authenticated via the web portal to access the SharePoint document library via a mapped drive.


2. Click Start, Right-click Computer, and then click Map Network Drive

3. Click the "Connect to a Web site that you can store your documents and pictures" link, and then click Next two times.

4. Type the site URL, click Next, and then follow the instructions in the wizard.

Depending on your permissions level you may need to map to a document library level

5. Remove the tick from "automatically detect settings" in your proxy settings page (found in the connections tab in Internet options).


This Really makes a big difference to folder traversal in explorer.


Conclusion


If you encounter issues with the mapped drive disconnecting follow these steps

Make sure that you are authenticated to Office 365. To do this, follow these steps:

1. Sign in to the SharePoint Online site by using your Office 365 credentials, and make sure that you click to select the Keep me signed in check box.

2. Open a document library in Explorer View.
3. Try to access the mapped network drive.


If you are authenticated to Office 365 and the issue persists, make sure that an entry for SharePoint is added to the Trusted sites zone in Windows Internet Explorer. To do this, follow these steps:

1. On the Tools menu In Internet Explorer, click Internet options.

2. Click the Security tab, click the Trusted sites zone, and then click Sites.
3. Verify that the following entries are listed in the Websites list:

https://*.outlook.com
https://*.sharepoint.com
https://*.microsoftonline.com
https://*.lync.com


4. If these entries are not present, add them to the Trusted sites list of websites.
5. Click the Local intranet zone, click Sites, and then click Advanced.
6. Verify that the following entries are listed in the Websites list:

• *.microsoftonline.com
• *.sharepoint.com
• *.outlook.com
• *.lync.com


7. If these entries are not present, add them to the Local intranet zone list of websites.

Tuesday, December 18, 2012

How to add Google Analytics to SharePoint Online


SharePoint Online provides some basic usage statistics if you browse to the /_layouts/UsageDetails.aspx and the /_layouts/Usage.aspx pages.
This is limited to 30 days, however, and there are only a few basic reports available. And they are not that accurate.
One way to improve this usage reporting is to use an online web analytics solution such as Google Analytics.

This will give you more detailed information about your users and let you view track statistics over any length of time.


SharePoint Online Analytics Features

Once you have set up a Google Analytics account and generated the tracking code you can use the steps below to add this to your Office 365 SharePoint Online environment.

  • Log into your SharePoint Online site such as company.sharepoint.com
  • Select Site Actions > Site Settings
  • Under Galleries select 'Master pages and page layouts' (or Master pages in the P1 plan).
  • Select the v4.master page file check-box and select 'Download a Copy' from the ribbon (Note if you are not using the default master page you should download the custom master page that you are using. To find out the master page you are using go to Site Settings > Look and Feel > 'Master page' ).
  • Open the master page file you downloaded with a text editor such as notepad and enter the Google Analytics tracking code just before the closing </head> tag and save the file
  • From the master page gallery select 'Upload Document' from the ribbon, select the master page file you saved in step 6 and click OK
  • You now need to Publish and Approve the file before it is visible to other users (note this isn't required for the P1 plan or if you have disabled approval). Before you do this I suggest browsing to the homepage in another tab so that you can check the site is not broken (this can happen if you enter the tracking code in the wrong place).

Wednesday, December 5, 2012

Office 365 Web Analytics

It's a shame, but the official position on Web Analytics for o365 is "UNSUPPORTED"

This is per Appendix B from the Service Description doc: http://www.microsoft.com/en-us/download/details.aspx?id=13602


But in reality, the links are just not there in the Site Settings > Site Collection Administration section.
You can simply append to your domain url the following to get to them.
this is kind of like an Easter Egg for SP365…

Just use the links..
/_layouts/UsageDetails.aspx This page has left navigation to assist you with analytics.

/_layouts/usage.aspx