Friday, March 4, 2016

Office 365 tenant name

You're stuck with it.


Unless the O365 team provides a support feature to change or add to your default tenancy name, the initial tenancy name that you choose on the sign up screen will be the same and only URL that works for all browser based sign on sites including SharePoint, OneDrive, Outlook, etc.

I bet you all think this doesn't happen a lot but I think I can name about 50 tenancy's like BrandName1.sharepoint.com right now and I can see plenty of room for;
  • 'Oops, I typo'ed it'
  • 'I thought we could change it later'
  • 'Had I known that I couldn't change it, I would have stopped right there'
There are no plans that I see on the roadmap to change this.

You should utilize the 6 P's of O365 on boarding and migrations.

Proper Planning Prevents Piss Poor Performance

Ask your client "Are you OK with this tenant name for ever and ever, through sickness and health?
Then check the names she suggests while on the phone with her using... PowerShell to the rescue!

http://pastebin.com/raw/5Y0dXnEa

Copy and Save the code with a meaningful name and run  as such: :
Get-TenantStatus.ps1 -name "leekspin"
This displays either "Taken" or "Available" ...so try putting your ex girlfriend's name in there.

Shout Out to Microsoft Engineer Aaron Dinnage with his awesome parenting post:
https://www.linkedin.com/pulse/how-check-office-365-tenant-name-availability-aaron-dinnage


Monday, October 19, 2015

O365 - Explorer Views & Mapped Drives

Users who are comfortable with Windows Explorer and the inherent ease of drag/drop & expanding tree structures will find using a SharePoint Library in a traditional “Explorer View” to be more familiar to them and easier to work with than SharePoint default libraries and metadata. Although the latter provides a world of search and display benefits, the former is an everyday familiarity use case for some.

Using Explorer View works especially well in Windows 10 where you have joined your company's Azure Active Directory.

Yes there are two paths you can go by …

   1. Open the Library in Explorer view each time you want to view it.

   2. Map a drive from Windows explorer for continued access to the Library.


Open in Windows Explorer

Before you map a network drive, follow these steps to Open in Windows Explorer

a. In Internet Explorer - Sign in to the SharePoint Online site by using your Office 365 creds. Make sure that you select the Keep me signed in check box. That little step is important.

b. Open a document library in Explorer View.

c. From your Team Site, go into your Document Library.

d. Under the Library Tools section in the Ribbon, click the Library tab.

e. In the Actions group, click Open with Explorer and Explorer should now Launch.


Mapping a network drive

Windows 7

To map a network drive to a SharePoint Online site, follow these steps:

a. Sign in to the SharePoint Online site by using your Office 365 credentials. Make sure that you click to select the Keep me signed in check box.

b. Open a document library in Explorer View as above – we need to do this to obtain the URL.

c. From your Team Site, select your Document Library.

d. Under the Library Tools section in the Ribbon, click the Library tab.

e. In the Actions group, click Open with Explorer.

f. Explorer should now Launch with your chosen Library

g. Right-click and Copy the URL from the Explorer window

h. From the tools menu click Map Network Drive.

i. Click the Connect to a Web site that you can store your documents and pictures link, and then click Next two times.

j. Paste the site URL, click Next, and then follow the instructions in the wizard.
For example: https://mycompany.sharepoint.com/Documents


This location will now be added as a Network Location in Windows Explorer

Note: You may need to enable the tools menu on Windows 7

1. Open a Windows Explorer window.

2. Click on Organize and Layout. (See screenshot below)

3. To Enable the Menu Bar

4. Click on Menu Bar to check it.


Windows 8/8.1

To map a network drive to a SharePoint Online site, follow these steps:

a. User Internet Explorer and Sign in to the SharePoint Online site by using your Office 365 credentials. Make sure that you click to select the Keep me signed in check box.

b. Open a document library in Explorer View as above – we need to do this for the URL.

c. From your Team Site, select your Document Library.

d. Under the Library Tools section in the Ribbon, click the Library tab.

e. In the Actions group, click Open with Explorer.

Explorer should now Launch with your chosen Library

f. Right-click and Copy the URL from the Explorer window

g. From the tools menu click Map Network Drive.

h. Click the Connect to a Web site that you can store your documents and pictures link, and then click Next two times.

i. Paste the site URL, click Next, and then follow the instructions in the wizard. For example, https://mycompany.sharepoint.com/Documents

This location will now be added as a Network Location in Windows Explorer

Note: You may need to enable the tools menu on Windows 8

1. Open a Windows Explorer window.

2. Click on Organize and Layout. (See screenshot below)

3. To Enable the Menu Bar

4. Click on Menu Bar to check it.

Windows 10

To map a network drive to a SharePoint Online site, follow these steps:

a. User Internet Explorer and Sign in to the SharePoint Online site by using your Office 365 credentials. Make sure that you click to select the Keep me signed in check box.

b. Open a document library in Explorer View as above – we need to do this to obtain the URL.

c. From your Team Site, select your Document Library.

d. Under the Library Tools section in the Ribbon, click the Library tab.

e. In the Actions group, click Open with Explorer.

Explorer should now Launch with your chosen Library

f. Right-click and Copy the URL from the Explorer window

g. From the tools menu click Map Network Drive.

h. Click the Connect to a Web site that you can store your documents and pictures link, and then click Next two times.

i. Paste the site URL, click Next, and then follow the instructions in the wizard.

For example, https://mycompany.sharepoint.com/Documents

This location will now be added as a Network Location in Windows Explorer

Note: You may need to enable the tools menu on Windows 8

1. Open a Windows Explorer window.

2. Click on Organize and Layout. (See screenshot below)

3. To Enable the Menu Bar

4. Click on Menu Bar to check it.

Troubleshooting & Known Issues

Note: There are some known issues with Mapping network drives.


Known Issues include:

1. Internet Explorer 10 (32 bit) on Windows 7 - does not work

2. Internet Explorer (64 bit) - does not work

3. Mapped drives will timeout after 8 hours


Troubleshooting Suggestions from Microsoft

How to troubleshoot mapped network drive issues


When using Open with Explorer, make sure that you are using IE 7 through 9 in the 32-bit version.

Note: IE 10 on Windows 7 is not fully compatible with some of the SharePoint Online features, but IE 10 is compatible on Windows 8.


Try running IE 10 in compatibility mode.


  1. Open Internet Explorer.
  2. Press the Alt key to display the Menu bar (or right-click the Address bar and then select Menu bar).
  3. Tap or click Tools, and then tap or click Compatibility View settings.


Make sure that you have lowered UAC to the lowest setting. For more information on UAC and how to change its settings, please refer to the below URL:
http://windows.microsoft.com/en-us/Windows7/What-are-User-Account-Control-settings


Ensure that you have added the following URLs to your Trusted Sites zone in IE:

      In your IE browser, select the "Tools" option (alt + x) and select "Internet Options" from the drop-down menu.

     1. Select the "Security" tab.

     2. Click on "Trusted Sites"

     3. Click on the "Sites" button

     4. Add the following sites:

       https://*.sharepoint.com

       https://*.microsoftonline.com

5. Click close and OK


In the Trusted Sites zone in IE, make sure that Enabled Protected Mode is unchecked.


Make sure that IE is passing through your credentials correctly:

In IE, select the "Tools" option (alt + x) and select "Internet Options" from the drop-down menu.

1. Select the "Security" tab.

2. Select "Custom level."

3. From here, scroll all the way down to the bottom to the "User Authentication" section.

4. Under the "Logon" section, choose the "Automatic logon with current username and password" option.

5. Select "ok."


When you are signing in to SharePoint, make sure that you are checking the option to use Keep Me Signed In.

1. Navigate to https://portal.onmicrosoft.com

2. When signing into the portal, check the option for "Keep me signed in."

3. Log in.

4. This will apply the settings needed.


Also, there may be third-party add-ins in IE which are interfering with the Open with Explorer feature.

It might be a good idea to reset IE back to its default settings by performing the following:

1. Open Internet Explorer.

2. Click Tools, in Internet Explorer 9 or above it is a gear icon located in the upper-right hand corner of the screen, and then click Internet Options.

3. Click the Advanced tab.

4. Under Reset Internet Explorer Settings, click Reset.

5. Select the Delete personal settings check box to remove browsing history, search providers, Accelerators, home pages, Tracking Protection, and ActiveX Filtering data.

Note: You will need to set-up your homepage again. However, your favorites will not be deleted

6. Exit Internet Explorer and then restart the program again as the changes will take effect once the browser is restarted.

Thursday, September 24, 2015

MMC cannot open the file

MMC cannot open the file C:\Windows\system32\taskschd.msc
Well, that stinks...I just had it open yesterday.

This is a known bug in certain versions of Windows 2008 or 2008 R2

To Fix:
Open Explorer and go to directory:
  C:\Users\USERNAME\AppData\Roaming\Microsoft\MMC\
and delete the taskschd file, (it has no file extension).
 Or if you are Nervous Nellie, just rename it.

run taskscd.msc again and voila! It opens.

Monday, August 17, 2015

How to enable automatic opening of Office documents from SharePoint for Chrome, I.E. & FireFox

And you may ask yourself...
Why am I unable to open documents in SharePoint?  
I see this browser message when trying to open Office documents from SharePoint...

Others in my organization can view files without issue, but some cannot. And I certainly do have Excel!

Well, the first part of the pop up message is true, you do have a version of Excel installed.

The reason you are seeing this is because second part of the message is false for you; your browser is misconfigured! You will need to enable two Browser Helper Objects in Internet Explorer, or use an AddOn for Chrome or FireFox.

How to enable automatic opening of Office documents from SharePoint for Chrome, IE & FireFox.

Instructions for Internet Explorer:

  1. Open Internet Explore open the Tools menu by click Alt-T (or click the gear icon)
  2. Choose Internet Options (or press o)
  3. Choose the Programs Tab
  4. Click the Manage add-ons button
  5. Scroll to the Microsoft Corporation section
  6. Highlight SharePoint OpenDocuments Class and assure it is enabled.
  7. Highlight the Office Document Cache Handler and assure it is enabled
  8. Click Close
  9. Refresh your webpage and you will now be able to open documents in your full MSOffice rich client application from within SharePoint when prompted.


Instructions for Chrome:

You will need to install the add-on IETab

  1. Get the Add On by searching add-ons for IETab, or here: https://chrome.google.com/webstore/detail/ie-tab/hehijbfgiekmjfkfjpbkbammjbdenadd?hl=en
  2. Click Add To Chrome
  3. A new IE folder icon will appear at the end of the URL address area in the browser


Instructions for FireFox:

Similar to Chrome IE-Tab, you will need to install the Add-On IE-TAB https://addons.mozilla.org/en-us/firefox/addon/ie-tab/

Thursday, February 12, 2015

You have reached the maximum resource usage limit

Our organization's O365 tenancy has a lot of Global Administrators.
Global admins have the ability to set among other things, SharePoint Site Collection Storage Quotas and the often misunderstood Server Resource Quota.

There has been misunderstood thought that by increasing this setting to some really big number, their site collection will have blazingly fast performance and every other site collection will chug along at their slow dial-up rate.

This is not at all true, and in fact you can really mess things up by setting these numbers too high.

Consider this:
A Site Collection is created and then assigned a huge number of resources. Then it is deleted.
This happens a few times and before long, your SharePoint Admin Center displays this ugly error and you are unable to manage resources on any of the collections.

You have reached the maximum resource usage limit. - Well dang!


And... you can't increase or decrease any site collection resource! Sort of a Catch 22, right? So you decide to start deleting site collections thinking this might help!


You would expect those resources to free up since you deleted them, right? But they just don’t and that mean ol' red bar stays red.

The deleted collection is in the Site Collection Recycle bin. Those resources are not reallocated just because you deleted it. They are still awaiting to be purged and those resources need to stay allocated until then.

 So what do you do?

PowerShell to the rescue!
Here is what we had to do to return our site back to normal.

First, query the site owners and ask if they have any sandboxed or custom code on their sites and need those extra resources to debug or step thought their code.
 If they do, understand their burden and pity them. Leave them to their debugging, and focus on the deleted sites and the sites where there is no custom code.

Then fire up a SharePoint Online or Azure PowerShell command prompt and connect to your admin portal,
connect spo-service http://contoso-admin.sharepoint.com 
…notice the -admin, it’s the URL of the admin portal.

Authenticate with a Global Admin account.

Open the admin console and look in the Site Collection recycle bin:


Grab the URL of a deleted site.
Then delete it, with extreme prejudice.
Remove-SPODeletedSite -Identity [URL of site in recycle bin]

Do this for each site in the recycle bin.

When that’s done, the ugly error "You have reached the maximum blah blah" and red bar ought to go away!

Nbow you need to attempt to set the resource quota for one of those collections that are set to some large number.
You might try reassigning it in the admin portal, but what fun is that? You still have that console open, so…
Set-SPOSite -Identity https://BigSite/sites/ituneslibrary  -ResourceQuota 300

Now all should be right in the world.

The resource usage quota is a site collection metric calculated by SharePoint Online. The main purpose of resource quotas is to limit the risk that sand-boxed custom code can have on available resources on a site collection, bad code causing excessive CPU use for example.

The actual resource quota used to be determined by the number of user seats in your company's subscription (#seats×200) +300 (may have changed now). 

So for a 10 seat license, the resource quota would be 2300 split across all site collections you own. 

HopeThisHelps,

John

Wednesday, October 15, 2014

Migrations from the Crypt

Despite what each 3rd party SharePoint Migration software company tells you, you may need to use a combination of tools to successfully migrate and overcome the limitations of each tool. On top of that, there are just some things that won’t migrate.
I am currently presenting these limitations and how to effectively use any and all of the available migration tools as well as Azure-PowerShell, iTunes, Peapod and your wits to get your migration accomplished with success.

Tuesday 6pm Portland ME
SharePoint Maine User Group                   


Monday, September 29, 2014

Auto-Tune and issues downloading large files form SharePoint Online

Some O365 clients may experience errors or disconnects or slowness with uploading/downloading large (>10MB) files from SharePoint Online. There is a workaround on client side. Need to disable Auto-Tune.
This will stay at some small % for a long time :

 Then eventually:


To fix this, from a command prompt ->
netsh int tcp set global autotuninglevel=disabled  

Shout out: http://sharepoint-community.net/profiles/blogs/o365-sharepoint-online-not-able-to-download-upload-large-file

Friday, September 26, 2014

Resolve Sync issues with OneDrive for Business

I recently had an issue that I still do not understand the root cause of. My OneDrive for Business folder was not syncing and certain files displayed with a red X icon, instead of the happy green Synced icon. I Uninstalled/Reinstalled 1D4B but still had the issue.

 I also found some un-synced files in the Archive folder at:
 C:\Users\John Mongell\OneDrive for Business Archives\Thursday, September 25, 2014 - 1\OneDrive

Whats more, each time I tried to access the 1D4B folder in Windows Explorer, a popup for each file would quickly appear and disappear: It said OneDrive for Business is not responding. Try again in a few minutes.

So, At last, I surfed to the file location C:\Program Files\Microsoft Office 15\root\office15
And typed Groove.exe /clean /all Then I restarted Groove (OneDrive) by simply typing groove.exe 

This caused it to start correctly and asked me to resync my local library.
 I confirmed the file locations and resynced, all is good now!

Hope This Helps.

Wednesday, June 25, 2014

MCSE and MCSD SharePoint Certifications

"Yes, there are 2 paths you can go by, but in the long run, there's still time to change the road you're on." 
- Robert Plant


MCSE: SharePoint Solutions Expert

Recertification exam every three years.


Step
Title
Optional training
Required exam
1
Installing and Configuring Windows Server 2012
2
Administering Windows Server 2012
3
Configuring Advanced Windows Server 2012 Services
NOTE : After successfully completing steps 1-3, you'll earn a
Microsoft Certified Solutions Associate (MCSA): Windows Server 2012 certification.
4
Core Solutions of Microsoft SharePoint Server 2013
5
Advanced Solutions of Microsoft SharePoint Server 2013


MCSD: SharePoint Applications Solutions Developer

Recertification exam every two years.


Step
Title
Optional training
Required exam
1
Programming in HTML5 with JavaScript and CSS3
2
Developing ASP.NET MVC 4 Web Applications

3
Developing Microsoft SharePoint Server 2013 Core Solutions

4
Developing Microsoft SharePoint Server 2013 Advanced Solutions


Also, there is this MCSD cert for SharePoint Apps.


MCSD: Web Applications - SharePoint Apps

Recertification exam every two years.


Step
Title
Optional training
Required exam
1
Programming in HTML5 with JavaScript and CSS3

2
Developing ASP.NET MVC 4 Web Applications
3
Developing Microsoft Azure and Web Services


GOOD LUCK

Friday, June 20, 2014

SharePoint External Sharing Explained

What are the external sharing features of SharePoint ?

• The ability to share sites and documents with authenticated users. 
    Authenticated users are those who are invited to sign in by using a Microsoft account or Office 365 user ID. 

• The ability to share sites and documents with guest users. 
    Guest users, also called anonymous users, don’t need a Microsoft account or Office 365 user ID to access your sites and documents. They access via guest links that you or your employees give to them.

• The ability to turn external sharing on or off globally for an entire SharePoint Online environment (or tenant). 
   Turning external sharing off at the tenant level means no documents, sites, or site collections can be shared externally.

• The ability to turn external sharing on or off for individual site collections. 
   This provides you with the ability to secure content on specific site collections that you do not want to be shared. 

Reference: 


Share sites or documents with people outside your organization.

There are three ways that you can do this:

• You can share an entire site by inviting external users to sign in to your site using a Microsoft account or Office 365 user ID.

• You can share individual documents by inviting external users to sign in to your site using a Microsoft account or Office 365 user ID.

• You can post or send users a guest link that they can use to view individual documents on your site anonymously.

Reference:

Tuesday, May 6, 2014

Forcibly Remove an Office 365 SharePoint Site

Lets say you have created a SharePoint online site-collection and then (purposely) deleted the site-collection and quickly need to recreate it using the same name.
...
I know...don't judge me..it was a perfectly logical outcome of the circumstance. ;-p

In order to recreate the URL the same within 48 to 72 hours, you will need to use the SharePoint Azure Powershell command utility to Forcibly delete the site collection out of the Recycle Bin with Extreme Prejudice. 

1. Connect to your admin portal site
    Type connect-msolservice 
  …and log in with your admin account
   Remember it is important to connect to the admin site:
     yoursite-admin.sharepoint.com 

2. Delete with Extreme Prejudice
Remove-SPODeletedSite -Identity https://contoso.sharepoint.com/sites/sitetoremove 

 Cheers!

Wednesday, April 16, 2014

Edit vs Contribute permission Best Practices

When you create a new SharePoint site and allow the 'Site Wizard' to set up Groups for the site, it will create 3 new groups including a 'Members' group.
The new group creation page clearly states: Members can Contribute content to the Web site.

So you would expect that the group has Contribute right, yes?
Before you add people to this group, I STRONGLY RECOMMEND that you go into Site Permissions and see that the Wizard has just lied to you!
He has set your Members group to the Edit permission level.

There is a pretty subtle, yet potentially enormous difference between these levels.
  •     Edit means you can have CRUD operations on entire lists and pages. 
  •     Contribute means you don't and can only add and delete items.


Lets see what your users will experience...


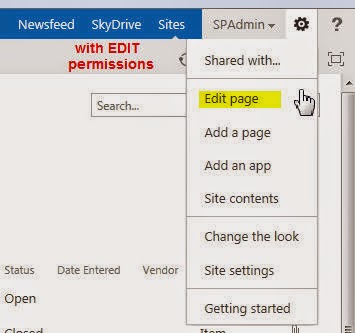
These users cannot edit a page and potentially delete your web parts!


And these users can!


These are the Ribbon commands differences.


A BEST PRACTICE would be to immediately CHANGE the permission level for the Members Group to Contribute, then add users to that group and then add another Permission Group called Department Site Editors that have this Edit permission level and add your PowerUsers to that group.
If your Power users are Site Owners then you don not need to create a Editors group.

Tuesday, April 15, 2014

Using OneDrive for Business Step by Step

A Step by Step guide to setting up your 1D4B sync on Win7 and the end user experience with setting this up.

Click the OneDrive link in your SharePoint or Office365 navigation bar.

Now...Go ahead and Press SYNC... and prepare for a wild ride!


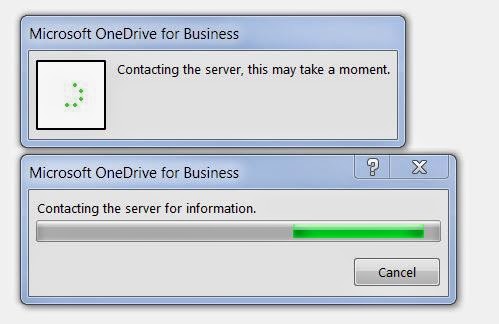
You will see a few 'Working on it' type popup messages like this one...


and this one...


Now, this last one. 

OK. User interaction time!
You will need to click Sync Now button above to "Release the hounds"
Depending on how much content you have in your Documents library, it can take a few minutes to SYNC it all.  If your online library is empty it should only take a minute or 2.


Finally... you see a shiny new Explorer Favorites icon for One Drive for Business with your files.


You are ready to work offline. When you update content in these folders, they will auto sync to the cloud if you are connected to the interweb thingy. Thanks to Ray Ozzie and GROOVE.EXE !

Thursday, April 10, 2014

How to Unsync a OneDrive for Business object

Why would you want to unsync? In my case I was syncing some RFP documents from a SharePoint library. We had finished the RFP and I want to now stop syncing and remove the files from my computer.

Some background: My computer has both a OneDrive for Business (1D4B) icon and a SharePoint icon. This means I have a MySite OneDrive for Business library synced into my 1D4B icon and I have SharePoint site libraries synced to my SharePoint icon.


 To stop syncing a library or something from either of these icons:


Right Click the OneDrive for Business icon in the Windows notification area, and then click Stop syncing a folder…

Select the folder you want to stop syncing, and then click Stop syncing. When you stop syncing a folder, this simply disconnects the folder from its library. All files are retained in the previously synced folder up on the server. You can sync the library to your computer again at any time in the future.


So now that you've done that, the files still remain on your computer but the individual file icons will change from the 'Synced' icons to the standard file icons.

You can now delete these (without any sync error) or keep them, up to you.

If you delete the SharePoint icon it will show up the next time you sync something from SharePoint, so dont worry if you 'accidentally' delete it.


1D4B vs Win2012R2 Share Folders

In 2013, MSFT Storage Team announced a new feature in Windows Server 2012 R2.
Work Folders enables user to access their work related files on the devices with configured Work Folders no matter whether the devices are joined to a domain or not and whether the devices are connected directly to the corp net or over the internet.

That is a nice upgrade from the Windows XP breifcase right? So, later comes One Drive for Business as a Cloud Based storage solution.

Last week a client of mine asked "Which solution do I implement?"

I gave him the consulting drinking game answer "It Depends".

While at SharePoint Saturday Philly I attended the single most underrated session, Ask the PFE's. where a panel of MSFT'ies answers all your burning questions. Kudos to that team, led by SharePoint Samurai Mike Gannotti @Gannotti

After a round of discussion, this is what the team said:  "It Depends"

Crack open a cold one and let's you and I discuss further.

The following table discusses how various Microsoft sync technologies are positioned and when to use each.


Work Folders
Offline Files
SkyDrive Pro
SkyDrive
Technology summary
Syncs files that are stored on a file server with PCs and devices
Syncs files that are stored on a file server with PCs that have access to the corporate network (can be replaced by Work Files)
Syncs files that are stored in Office 365 or in SharePoint with PCs and devices inside or outside a corporate network, and provides document collaboration functionality
Syncs personal files that are stored in SkyDrive with PCs, Mac computers, and devices
Intended to provide user access to work files
Yes
Yes
Yes
No
Cloud service
None
None
Office 365
Microsoft SkyDrive
Internal network servers
File servers running Windows Server 2012 R2
File servers
SharePoint server (optional)
None
Supported clients
PCs and devices* inside or outside a corporate network
PCs in a corporate network or connected through DirectAccess, VPNs, or other remote access technologies
PCs, iOS, Windows Phone
PCs, Mac computers, Windows Phone, iOS, Android
*Work Folders apps not yet announced.


Conclusion:
Until the WorkFolders App is released (unknown) the answer is clear that if you need both device independence with multiple device access, OneDrive for Business is the answer.
If you need internal access only, WorkFolders can be the best solution.
But other than that, I see no reason NOT to go with more functionality you get with OneDrive for Business.


Wednesday, March 26, 2014

Microsoft Social Listening MSL for Dynamics

I want to share a new product that MSFT is planning to roll out to GA Q2 or Q3 2014.
This new product comes about as a result of a few important acquisitions for Microsoft.
First, Parature, a leading cloud based customer self-service portal is exactly something Dynamics CRM has been in need of providing.
Second and third are 2 social engineering start ups NetBreeze and InsideView.

These screens are very new, so expect them to change!
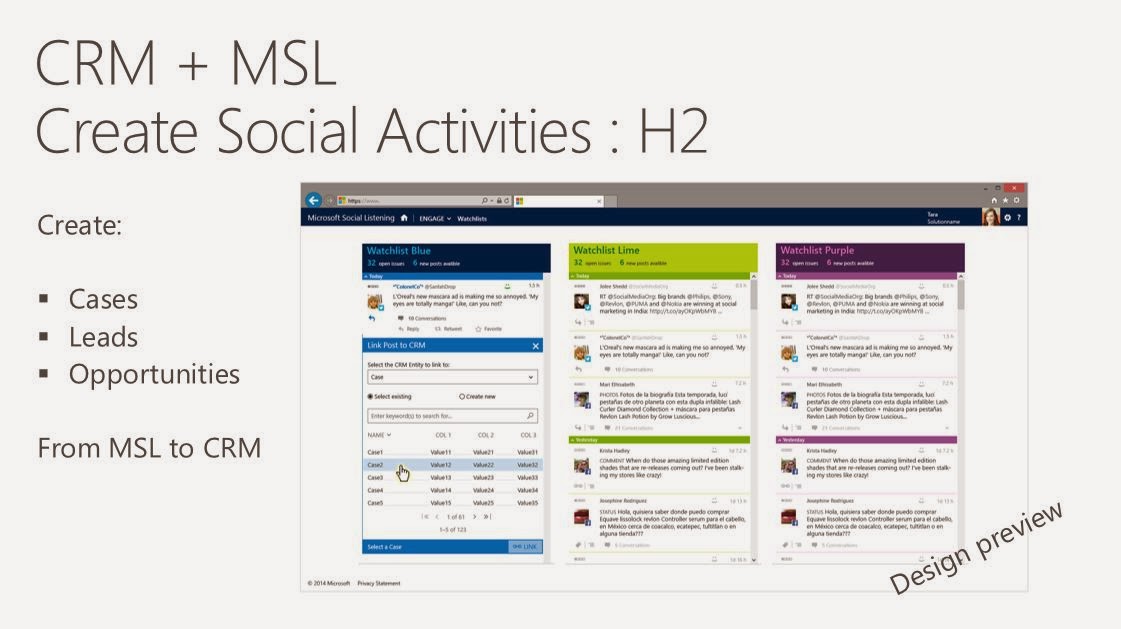
Microsoft Social Listening is a way to provide users with BI Analytics of social activity and tie it to a CRM record. Wow. Twitter Analytics in Excel was just a bit of what MSL can provide from a BI perspective. But the sheer volume was exhausting even for PowerBI for the end user. My PowerBI Twitter Analytics data refreshes were taking 10 minutes. MSFT has invested heavily in the Twitter firehoses, something the start ups could not afford, so these posts are 'near' real time.
Shout out to Girish Raja for his teams efforts and the slides from SPC 284

The last screen is where you map the post to a CRM record.


Wednesday, March 12, 2014

SharePoint 3rd party Product Announcements made at the 2014 SharePoint Conference


A flurry of new product announcements were made at SPC14. Here are a few of the big players...

ShareGate
I spoke with owner Benjamin Niaulin while on the bus to the Las Vegas Speedway where he suggested downloading all available tools now and letting them auto update. They are a SCRUM team, so they release patches biweekly.

The biggest request from his no-brainier migration tool was to truly make it no-brainier and make all features available in PowerShell. This gives you the ability to schedule a migration task. The announcement the next morning came via email that they released PowerShell utilities and I was ecstatic that our customer who use Layer2.de with it's horrible support can now use ShareGate, which costs less and who's Help and Buttons are not written in German! 
  • PowerShell Commands 
  • Scheduling made possible through PowerShell 
  • Choice Column values copied even if a choice is no longer available 
  • Export to Excel let’s you Merge documents, rename them or move them 

Harmon.ie 
launches first enterprise collaboration hub. The product has come a long way, but not long enough in my mind. 


Yaccov Cohen created a first ever SharePoint Top Influencers list. Dignitaries include Marc Anderson, Jeremy Thake, Scot Hilier…but they didn't include the Bottom Influencers list, who could include Chris McNulty, Mike Gilronan and myself.

Bamboo Solutions
The latest version of Bamboo Solutions’ process automation solution is now available for SharePoint 2013. Bamboo Workflow Conductor 3.5 allows users to create, manage and reuse custom business processes without having to do custom coding. 

K2 
announces K2 Appit release, delivering no-code workflow apps for Microsoft SharePoint Server 2013 and Microsoft SharePoint Online, in the cloud.

KnowledgeLake 
expands Office 365 capabilities for SharePoint ECM suite of products
KnowledgeLake has announced it is bringing the power and functionality of KnowledgeLake Imaging to Office.  
Metalogix 
Metalogix announced a complete solution to move e-mail, files and SharePoint content to Microsoft Office 365. Metalogix has expanded its suite of content and collaboration tools with the announcement of Email Migrator 3.0 and Content Matrix 7.0, which work together, or independently to expedite the migration of email, files and SharePoint into Office 365 and better enable an organization’s.

Qbase 
Qbase LLC, a leading provider of information technology and business intelligence solutions, today announced the launch of MetaCarta for SharePoint 2013, a plug-in enrichment service that geo-enables both structured and unstructured content inside the SharePoint 2013 environment

Tuesday, March 11, 2014

SharePoint Conference 2014 Recap

Last week I attended the 2014 SharePoint Conference. 
This was my second SPC and I was able to pace myself enough to keep much better notes up until the last day. Last year I had burned out early, as there is only so many sessions one can attend in a week, my mind was numb. I attended a variety of sessions including Executive, ITPro, Developer and Business User. I think this was the reason why my last SPC was so difficult for me by the final day, as I had attended pure ITPro and Developer sessions and took 2 tests, whew! Exhausting.

Keynote
The Keynote was delivered by President Bill Clinton who encouraged us to "do good" while making advancements with our technology. He impressed us with examples of how technology assisted The Clinton Foundation's efforts in (among a few) post earthquake Haiti to align the country's only mobile provider with the Dutch bank so that people can have access to banking and their money. 
Basically, make the world a better place with technology. 
(See 'Matrix Reloaded' and 'IronMan' and 'Hitchhikers Guide to the Galaxy' movies for shining examples of how Technology can Do Good)


User Voice 
There were many product announcements made, which I will blog separately. The single most impressive take away for me was the incredible openness and reaching out that the MSFT Office and SharePoint teams expressed with the attendees. It was very refreshing. My Tweets were answered and favorited by those teams many times. In fact, When Sonya Koptyev announced the UserVoice site at the InfoPath Roadmap session we were blown away that they had launched an entire site dedicated to our user feedback.

Office Social Graph and Oslo
The next BigThing was the OpenGraph and Oslo. This blew my mind because of the nature of an app fabric that connects content with Users, AD and Yammer activity feeds. The code name Oslo is the display method for the Announcements on steroids style view that is so exciting, blogs are sprouting up about it like mad daily. 

Connecting Content through People
Oslo is a search technology mostly, and it inspires us to search for people instead of document names or metadata. Content is trending around people, or me. People present content to me. I search for these trends and OfficeGraph filters and bubbles content that I want to see through Oslo display templates.